Posts

Android Project Compilation,Execution and Installation

Image
So till now we got to know about the Android Project creation. Now next thing i want to keep in front of you is how android projects are compiled and executed. Android Project Compilation,Debugging and Execution   So I will give you detailed description about this diagram . 1) First of all every Android project must have one Auto-Generated file R.java . This file contains a List of All the attributes we have used in our android Project and a Corresponding Hexadecimal Value. It also contains a Hexadecimal value of main(layout) and app_name(string) . We can find this file in Project_Name/gen/package_name/R.java. This file shouldn't be removed otherwise an Android Project will not Work. 2) Secondly, this R.java file along with Application Source Code(.java Files) and Java Interfaces and alternatively .aidl files(Android Interface Definition File) are compiled with JAVA Compiler to create Class Files(Object Code). 3) After compilation step, a .dex file is created tha

Android Project Creation

Image
Although Android Project Creation is very easy if we use any IDE for it like Eclipse . But Before that we must know about android SDK installation. First of all we need to install a Android SDK package from Google. after the installation of this package, we need to make selection of which version you want to use Eclair, Froyo,Gingerbread,Honeycomb or Ice-Cream Sandwich. You can easily get the configuration details related with Eclipse easily on the web. But i am going to tell you creation of Project using Command Line First of all we need to do following configurations in System's Environment Variables: Go To -> My Computer -> Properties -> Advanced , then Click on Button Environment Variables, then a New Dialog Window Will appear. Now Under the System Variables title look for path. Double Click on it and enter the following things in value. Values are Separated by semicolons. Apache ANT location may Vary but Android SDK should be in the C:\ Drive only.  1) C:\Pro

Android Application Architecture

Image
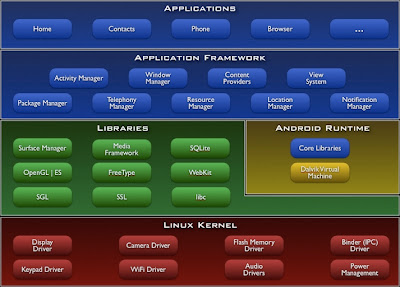
Android Architecture   So The Picture Shown Above Briefly describes the architecture of Android. 1) O n the Bottom Level, Linux kernel Provides the necessary Configurations and drivers and overall Management required for running android OS. Like Display driver keeps track of Resolution, Per Pixel Intensity (PPI). Camera Driver keeps track of Camera Settings like Picture Resolution, Effects etc. Flash Memory Driver takes into account of Flash Memory like ROM(for installation of OS), RAM(for Smooth Multitasking) and SD card(for storage and installation of Applications). IPC(Inter-process Communication) Diver is necessary for communication between the processes for example: you want to play an audio, then Music player process has to communicate with the Audio driver process. Keypad Driver takes care of Virtual Keypad that is used to type the data that you want to send in a Message or E-Mail. Next is WI-Fi(Wireless Fidelity) Driver that keeps track of Wireless Devices in

Android Development Guide

Hello Friends,                         Today I want to Share with you all my Experience with the Android Platform. Android Platform is easy to understand but you must have some idea about XML and Swings . Although they are not required, but person having knowledge of these Technologies will be an added advantage in learning the concept.   Android Development Starts with following things in your mind specifically : 1) The Processing Should be Quick. 2) Start-up shouldn't take too much time. 3) It should have Multitasking Capabilities. 4) CPU Utilization should be less. 5) Graphics Performance should be Good so that you can play even HD games on it. 6) Per Pixel Intensity should be appropriate so that pictures can't get blurred. 5) Less Phone Memory should be Used, it means you must have some capability to move Apps from Phone to SD Card. This can be Done by Rooting the Phone and install one application from Android Market.   Although Rooting can JailBreak Yo